M2 Software  

This section will discuss the software architecture of M2 and explain the reference design available on the NLR GitHub at MODAQ2. For discussion on design decisions and details on technical aspects of the software design, please see the Technical Reference page.
Introduction
M2 leverages the ROS2 ecosystem of libraries and tools to provide a well established way of developing a data acquisition system suitable for a variety of projects. ROS2 was selected because it is easy to learn, has a robust support community, completely free and open-source, supports multiple programming languages, and is reliable for long term use in industrial settings. There is also a plethora of existing ROS packages that users can leverage in addition to the packages we developed for MODAQ 2.
The MODAQ 2 project is an amalgamation of ROS packages, tools, and guidance for developing data acquisition and control applications for marine energy devices using a ROS based architecture. The MODAQ 2 Reference Design includes several packages that are targeted for laboratory and field applications and allow most developers with a basic background in programming to spin up a high-quality DAQ and control system. While we say 'for marine energy devices', that points to M2's origin (and some of its instrument support) and not necessary its exclusive domain. M2 can be used in a wide variety of applications that need a performant and reliable data acquisition solution.
The main software aspects of MODAQ 2 are as follows:
- Ubuntu Linux Operating System
- ROS2 Humble Hawksbill (or Jazzy Jalisco for Arm64)
- Community Developed ROS Packages
- NLR Custom Developed ROS Packages
- Third Party DAQ Driver libraries
Ubuntu Operating System
Ubuntu is a free to use1 Linux distribution that has Tier 1 support2 by the ROS ecosystem. To get started working in Ubuntu, it is recommended to visit the Hardware page of this document to ensure that your controller meets the requirements of the MODAQ 2 design. After that, you can follow the instructions provided below to install the correct version of Ubuntu Desktop on your controller. At the present time, select Ubuntu 22.04 Desktop for x86_64 (Intel and AMD64) controllers and Ubuntu 24.04 for Arm64.
Note
Ubuntu 24.04 officially supports the Raspberry Pi CM5 hardware. Since ROS2 releases tend to be tied to specific Ubuntu versions, Arm64 applications will need to use ROS2 Jazzy instead of Humble.
M2 was originally written for x86_64 controllers with Ubuntu 22.04 and ROS2 Humble. We have yet to validate 24.04 with ROS2 Jazzy on x86_64. Regardless, installation and setup instructions are the same, with the exception of selecting the appropriate installers.
Installing Ubuntu 22.04 on x86_64 Controllers
The easiest way to install Ubuntu on a x86_64 controller is to create the installer on a USB stick.
-
Download either the Desktop or Server install image here.
Ubuntu Desktop or Server?
Either Ubuntu Desktop or Server edition can be used with M2.
Choose Desktop if: you might want to connect a keyboard, mouse, and monitor to the controller and rather work in a graphical desktop environment. This option will install a number of apps that may or may not be useful, such as LibreOffice. This will consume more space on your OS install target and require at least 4GB of RAM. Some networking and other tools that ship with the Server edition (such as SSH) can be easily installed in the Desktop version.
Choose Server if: you are comfortable working in the command line interface (AKA terminal/console). While this a bit more complex, the command line is used extensively with M2 and ROS2, so there's no avoiding it. Desktop features can be installed in Server if so desired.
Desktop and Server equally support remote development (such as VS Code Server).
-
Install a USB writer utility, such as BalenaEtcher, which is available for Windows, Linux, and MacOS hosts. (NOTE: Ubuntu has a creation tool built in: Startup Disk Creator. So you can skip this step if you're using a computer with Ubuntu to set up the controller)
- Burn/etch the Ubuntu 22.04 file downloaded in Step 1 to a blank USB stick.
-
Place the newly etched USB stick in a USB port on the controller target and boot from the stick.
Note
Most x86_84 based controllers should be set to automatically boot from USB media, however if this does not happen, it may be necessary to go into BIOS and change the boot order so that the USB ports are prioritized. This process varies from manufacturer to manufacturer, so consult documentation for your controller if unsure how to do this.
-
Follow onscreen instructions to install the OS to the desired location on the controller.
Installing Ubuntu 24.04 on Raspberry Pi CM5 (Arm64)3
There are a couple methods of installing an OS to a CM5, which to chose will depend on the version of the CM5 you have and where you want the OS to be installed. We chose CM5s with onboard eMMC storage and installed the OS there. We could have opted to install the OS to the NVMe SSD drive, however we prefer to use the SSD for data only. If the OS and data reside on the same drive, it's more involved to swap the drive (for instance, it might be desirable to quickly replace a full drive with an empty one in the field), since the OS will need to be cloned to the new drive. Lite variants of the CM5 (those without eMMC) could have the OS installed to a microSD card.
Download the Ubuntu 24.04 Desktop install image here or Server image here.
Ubuntu Desktop or Server?
Either Ubuntu Desktop or Server edition can be used with M2.
Choose Desktop if: you might want to connect a keyboard, mouse, and monitor to the controller and rather work in a graphical desktop environment. This option will install a number of apps that may or may not be useful, such as LibreOffice. This will consume more space on your OS install target and require at least 4GB of RAM. Some networking and other tools that ship with the Server edition (such as SSH) can be easily installed in the Desktop version.
Choose Server if: you are comfortable working in the command line interface (AKA terminal/console). While this a bit more complex, the command line is used extensively with M2 and ROS2, so there's no avoiding it. Desktop features can be installed in Server if so desired.
Desktop and Server equally support remote development (such as VS Code Server).
Install the Raspberry Pi Imager on the Host Computer
Following the installation instructions found here.
Install Ubuntu on microSD Card (CM5 Lite only)
It's recommended to follow the instructions in the official Raspberry Pi Documentation. In Step 2, do one of the following (not both!):
- Download the Ubuntu 24.04 install image from the link above. Scroll down to "Use custom" in the Raspberry Pi Imager software. In the file dialog that pops up, select the image you downloaded.
- Scroll down to "Other general-purpose OS" in the Raspberry Pi Imager software. On the next screen, select Ubuntu, then Ubuntu Desktop 24.04.4 LTS (64-bit). The imager software will download the OS.
The final step is to select the destination for the software to write the OS image, per the documentation.
Install Ubuntu to eMMC or SSD drive
This is a bit more involved and borderline hacky, but this is how it's done! NOTE: this method can be used with a CM5 Lite for installing the OS to an NVMe/SSD instead of microSD (Lite models do not have eMMC).
- Download the desired Ubuntu 24.04 image per links above (optionally, the image can be selected and downloaded in the Raspberry Pi Imager software during Step 8).
- Install the USB Boot utility on your host computer per the instructions found here.
- Place the CM5 in USB Boot Mode. If using the OEM CM5 carrier board, this is accomplished by jumpering 2 pins on the carrier board:
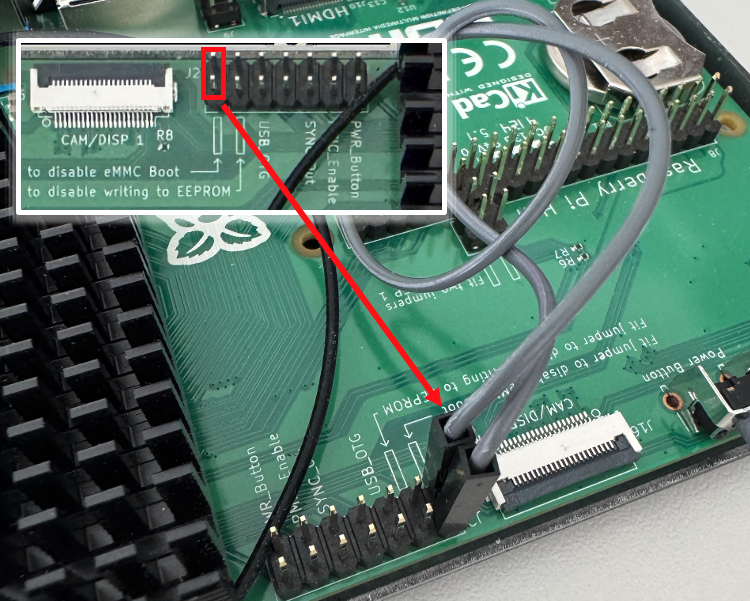 If using a 3rd party carrier board, consult the instructions for that board to place the CM5 in USB Boot Mode.
 - Connect the USB-C connector on the carrier board to your host computer
- Make sure rpiboot that was installed in Step 2 is running. The CM5 should now be mounted.
- Launch the Raspberry Pi Imager software
- In the Imager software, select RASPBERRY PI 5 as the Raspberry Pi Device.
- Under Operating System, do one of the following (not both!):
- Download the Ubuntu 24.04 install image from the link above. Scroll down to "Use custom". In the file dialog that pops up, select the image you downloaded.
- Scroll down to "Other general-purpose OS". On the next screen, select Ubuntu, then Ubuntu Desktop (or Server) 24.04.4 LTS (64-bit). The imager software will download the OS. (NOTE: It's possible that a later version of Ubuntu 24.04 LTS will appear in the Imager options. This is okay, simply select the latest version that starts with 24.04)
- Under Storage, find the CM5 target where the OS is to be installed (either the eMMC or NVMe SSD).
- eMMC - There should be an option with wording similar to this: "mmcblk0 Raspberry Pi multi-function USB device". The important part is the "mmcblk0", where "mmc" is the eMMC.
- NVMe SSD - There should be an option with wording similar to this: "nvme0n1 Raspberry Pi multi-function USB device". The important part is the "nvme0n1", where "nvme" is the NVMe SSD.
- Proceed to flash the OS to the selected target. WARNING: this step will erase the target. Make sure the target is either blank or contains nothing of value since it will be deleted.
- Remove the jumper installed in Step 3 and apply power to the carrier board. The CM5 should now boot into Ubuntu.
Why ROS2?
 The Robotic Operating System (ROS) is a collection of libraries, tools, and middleware that were designed to benefit the robotics development community. The qualities of ROS that benefit the robotics community also benefit the data acquisition and control for marine energy community. It includes native functionality, such as concurrent processes, interprocess communications, saving data, and runtime parameter loading, which reduces development load. It provides an easy entry point for software development for data acquisition control but it also is very scalable and has the capabilities to do very advanced computational tasks if needed for a project. For example, after installing ROS2 and MODAQ 2 packages, you can quickly run a process that collects and logs sensor data in mcap bag files4 for data analysis. However, if you need to build code that is deterministic or real-time, this is also possible with ROS but requires a much lower level understanding of computer programming and is likely not necessary for many applications. In summary, ROS is adaptable and extensible to meet the requirements of a data acquisition and control project.
Note
Unless otherwise noted, wherever we say ROS, we mean ROS2. There are significant differences between ROS1 and ROS2 and they are not directly compatible. Use caution when searching for ROS online, a lot of links often go to ROS1 resources.
The fundamentals of ROS are covered extensively in many online trainings, videos, whitepapers and classes, and we have collected our recommended starting places in the Useful Links page.
For MODAQ 2 usage, the main concepts to understand are as follows:
- Nodes: the software processes that make up a ROS system
- Packages: collections of nodes usually including all the necessary nodes to use a system component
- Topics, Messages, Publishers and Subscribers: how ROS nodes communicate with each other
- Middleware DDS: the background system that allows nodes to communicate reliably and with modularity
- Command Line Tools: useful tools to test and debug ROS systems
- Build System: colcon is used to build ROS2 packages
- Launch Files: files that define the startup and execution of a complete ROS system
- Parameters: configuration items that can modify how the ROS system operates
- Bag (mcap) files: data files that database the information collected and communicated through ROS
Install ROS2
 It is recommended to follow the step-by-step process available from ros.org to properly install ROS2 on the linux controller target.
For x86_64, AMD64 targets using Ubuntu 22.04.x, install Humble Hawksbill.
For ARM64 targets using Ubuntu 24.04.x, install Jazzy Jalisco.
The following command will verify the proper installation of the main components of ROS on your Ubuntu 22.04 controller. This doesn't include the Labjack LJM Library which is required for using the Labjack T8 device. Instructions for installing this are described below.
## Please follow the provided instructions for installing ROS2 but you can verify the install with this command:
sudo apt update
sudo apt upgrade
sudo apt install ros-humble-desktop ros-dev-tools ros-humble-rosbag2 ros-humble-rosbag2-storage-mcap nginx git curl linuxptp ros-humble-rosbridge-suite
Cloning the M2 Code Repository
Follow the instructions described in M2 Code Repository.
Brief Description of the M2 RD Features and Functions
The M2 RD (and M2GO) 'ships' with several capabilities and I/O support from the larger M2 codebase. We chose to limit the RD to basic, core functions that are common across most M2 builds as a useful technology demonstration. If a needed feature or input device is not found in the RD, chances are, it's available in the full code. Contact the development team for more information.
M2 Launch and Configuration Files
M2 utilizes the launch and configuration features available in ROS2. The launch file contains the instructions to easily start the M2 application with a single command while the config file contains parameters that are passed to specified nodes at runtime. During development of M2, we tried to make M2 nodes as stateless as possible. This means we avoided hardcoding values that are likely to change, such as the IP address of a device or the email addresses for sending alerts. Instead, these can be specified in the config file.
The m2_launch package cloned from the repo includes the python launch file which starts all the parallel processes (nodes) of the MODAQ 2 system. In m2_launch.py, the nodes of the system are specified and the config file is supplied. All ROS parameters of a node should be specified in the config file.
Note
The name of the node specified in the launch file must match the node name used in the yaml config file. I.e. M2Supervisor is specified in both in the launch file and the config yaml file.
Example launch and config files:
# Launch File
import yaml
import os
from launch import LaunchDescription
from launch_ros.actions import  Node
from launch_ros.actions.node import ExecuteProcess
from datetime import datetime
from ament_index_python.packages import get_package_share_directory

#### PATH TO MODAQ CONFIG FILE ######
## FYI THIS PULLS THE FILE FROM THE INSTALL DIRECTORY, NOT THE SRC DIRECTORY
config = os.path.join(
      get_package_share_directory('m2_launch'),
      'config',
      'm2_config.yaml'
      )

def generate_launch_description():

  return LaunchDescription([
    Node(
    package    = "m2_supervisor",
    executable = "m2_supervisor_node",
    name = "M2Supervisor",
    parameters = [config],
    output="screen",
    respawn = True
    ),
    Node(...other nodes)
  )]
# Config File
M2Supervisor:
  ros__parameters:
    loggerPath: "/home/m2/Log"
    loggerLimitBytes: 1000000
    emailSendAddr: "youremailwithsmtpenabled@email.com"
    emailSendPwd: "passwordhere"
    emailGroup1:
      - "youremail@email.com"
    emailGroup2:
      - "youremail2@email.com"
    analyzedTopics:
      - /ain_flap
      - /T8din
    topicErrorEmailSnooze: 60
The launch file and config files are moved once the build process is completed. To access these files, you must run source install/setup.bash in terminal. You should then be able to launch the file with the command ros2 launch m2_launch m2_launch.py. Executing this will start all the ROS nodes together. If this fails, errors will be reported in the terminal to assist you with troubleshooting.
MCAP Bag Data Files
The data collected by different nodes within MODAQ 2 is published on specific topics. This enables the data to be recorded and saved for future use. This is implemented by using the ROS2 bag recorder node and the mcap storage method. The ROS2 bag package can be installed by running sudo apt install ros-humble-rosbag2 ros-humble-rosbag2-storage-mcap in terminal. This is a useful tool for debugging robotic applications however, it is designed with enough reliability to function as a robust data recorder for data acquisition applications. The bag_recorded package in the MODAQ 2 reference design takes the rosbag2 API and adds some flexibility to it to allow for recording only specified topics as well as the ability to start and stop the recording programmatically.
Configuring Bag Recording
The bag_recorder_node is configured in the launch file configuration yaml file and includes the folder in which to save the bag files (mcap files). It includes the length of the files in seconds. It is best to break up the mcap files so they don't become too large and to reduce to possibility of corruption if the system crashes or power is lost. It also includes the logged topics. All topics in this list will be included in the bag files. You can also enable recording all topics by specifying "*" as the logged topics.
BagRecorder:
  ros__parameters:
    dataFolder: "/home/m2/Data"
    fileDuration: 60
    loggedTopics:
      - /system_messenger
      - /ain
      - /do
      - /T8din
MODAQ Messages
modaq_messages is a custom message specifier that is used in MODAQ 2. ROS includes many message types by default but it was deemed necessary to build our own custom message types more applicable to our application of data acquisition. This ROS package has no nodes in it but it includes the CMake commands to turn the msg files into headers which can be referenced in different nodes. For example, /system_messenger uses modaq_messages/msg/systemmsg.hpp to define the type in different nodes. To use these custom messages, they must be included in the package.xml and the CMakeLists.txt file.
CMakeLists.txt:
find_packages(modaq_messages REQUIRED)
ament_target_dependencies(m2_supervisor_node rclcpp std_msgs modaq_messages rosbag2_cpp)
M2 Supervisor
The m2_supervisor is a package that serves as the central process of MODAQ and includes some functionality that users may find valuable. It includes features for logging events, sending emails and monitoring the health of the bag files being recorded.
Logger
The logger processes /system_messenger messages that have the log switch turned on and stores the information into a human-readable text file for diagnostics during operations.
A rate-limiting feature called the "snoozer" can be enabled in messages posted to /system_messenger to prevent flooding the log with repeated message occurrences. This will suppress duplicate message writes over the selected time interval. For instance, if a 100 Hz loop encounters an error that publishes to /system_messenger, the snoozer will prevent 99 duplicate messages per second from getting written to the system log. If the messages continue after the snoozer expires (e,g. the error condition persists), the snoozer will allow another write of that message to the system log and then snooze again for the set interval time.
Emailer
The emailer processes /system_messenger messages that have the email switch turned on and sends an email with smtp which contains the important information in a human readable format. For this to work, you must have an email with smtp enabled - this is possible with a free gmail account.
Up to two distribution lists are support in this release of the Emailer and those lists can be populated in the config file. Each list can contain one or more email addresses, however, if there's going to be a lengthy list of recipients, it's suggested to create a group (using something like google groups) so that the logger only sends out one email and that gets distributed to the group.
Distribution list 1 is always enabled if emailing is selected for the alert topic. If distribution list 2 is enabled, both list 1 and list 2 will receive the message. Best practice for this system is list 1 is used for developers or maintainers to receive critical or diagnostic system related messages, while list 2 is would be used for more general status updates.
The snoozer feature described in the logger section also applies to emails. If enabled, it will suppress repeated messages over the preset interval to prevent email floods.
BagAnalyzer
Coming soon! This feature is still under development. The goal is to develop a process that monitors bag recording to ensure that all topics are being recorded as expected.
Labjack T8 ROS Package
The labjack_t8_ros2 package was developed specifically for use in MODAQ 2. This packages relies on a third party driver to interface with the Labjack T8.
Labjack LJM Library
MODAQ 2 Reference Design includes the Labjack T8 to make high-speed measurements up to 40 kHz. We have provided the labjack_t8_ros2 package to connect to T8 devices and stream data to M2 so it can be acted upon with control rules and/or logged as measurement data for post-processing and analysis. To use the labjack_t8_ros2 package, the Labjack LJM library needs to be installed on your controller.
The instructions for installing this library are found in the INSTALL.md contained in the installer zip package (x64, Arm) or on the Labjack website (x64, Arm)
M2 Control
The M2 and ROS2 ecosystem are well suited for simple through advanced control operations. In this reference design, we've included buttons in the HMI to toggle two separate DO (digital output) channels on the Labjack T8 manually as a demonstration. A control algorithm could be implemented in the included m2_control.cpp node to perform some automated action based on the value of one of the published parameters. For example, if one of the analog inputs was measuring water level in a tank, control logic could be developed to turn on a pump when the tank reaches a certain level (threshold) and turn it back off when a different threshold is met. This could be expanded to allow an HMI operator to manually control the pump and/or override the automation.
It's possible to employ state-machines, PID, or more sophisticated methods to achieve the desired level of control. We've developed MODAQ systems with numerous control groups, each containing several individual control rules. In some cases, control rules may have had co-dependencies with other rules or had rule hierarchy- it's possible to create some elaborate control schemes with M2.
ROS2 also has built in control algorithms that you may find useful despite their main focus being on robot control. See the package ros2_control to learn about the advanced control options developed for use in ROS2.
Human-machine Interface
The HMI is described on the HMI page
Headless Operation
MODAQ 2 will often need to run headless (without a monitor) or automatically start on the boot of the controller. This can be done with linux services.
Instructions for putting this in place can be found here
Precision Time Protocol
The precision time protocol or IEEE1588v2 or PTPv2 is a protocol used for synchronizing clocks on a network. While this can be done at the software level on the linux kernel, it is recommended to use a hardware implementation for synchronization in the microseconds or better. To do this, the network interface card (NIC) of your controller must officially support PTP. This can be determined by the model number of the NIC which can be found with the command lspci | grep Ethernet which returns (for example):
01:00.0 Ethernet controller: Intel Corporation I210 Gigabit Network Connection (rev 03)
03:00.0 Ethernet controller: Intel Corporation Ethernet Controller (2) I225-IT (rev 03)
For more information on PTP, including getting started and setting up PTP services on your controller see this section in the Technical Reference.
-
Always read the licensing terms and conditions, but for most use-cases there's no fee. The publishers of Ubuntu do offer Ubuntu Pro as a subscription that offers technical support among other features. ↩
-
According to ros.org: "Tier 1 platforms are subjected to our unit test suite and other testing tools on a frequent basis including continuous integration jobs, nightly jobs, packaging jobs, and performance testing. Errors or bugs discovered in these platforms are prioritized for correction by the development team. Significant errors discovered in Tier 1 platforms can impact release dates and we strive to resolve all known high priority errors in Tier 1 platforms prior to new version releases." ↩
-
Other Arm64 platforms may work with M2, but we have only tested the CM5. Essentially if Ubuntu and ROS2 install and run without error (or syslog entries indicating problems with core systems), M2 should be fine. ↩
-
A Bag File is the ROS-standard data storage container. It allows a convenient way to log measurement and other M2 system messages MCAP is an open-source storage format for bag files that is faster and has better data integrity than the former storage format (SQLite). ↩